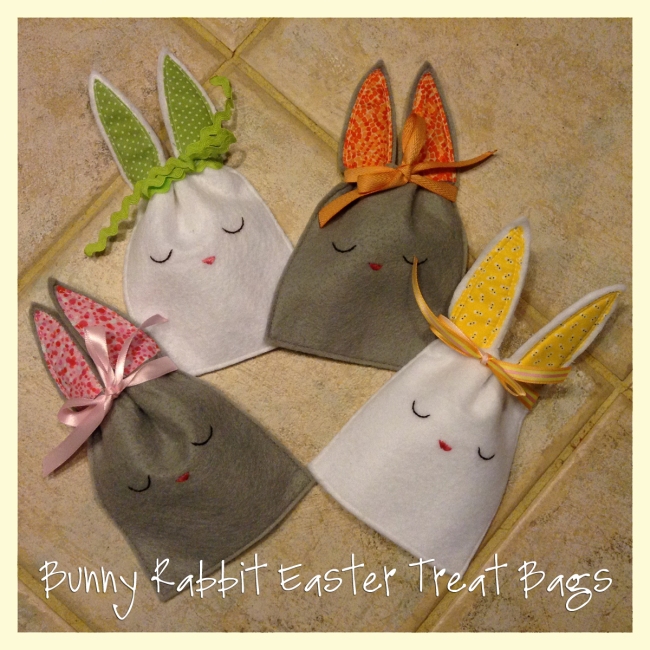
Lots and Lots of Easter Bunnies
The Eight-grader is in orchestra and has been for three years. Our area has great music programs that we are very happy to support in any way we can. Sunday and then again tomorrow night are silent auctions to benefit two different Orchestra programs. Since few middle school/high school parents are in the market for newborn items, I opted to find some other items I could make for the auctions and settled on two really cute Easter projects made from felt.
Dark and White ‘Chocolate’ Easter Bunnies. I made some like these a few years ago for my Easter mantel and LOVE them. They come out every year for Spring. Pretty easy to make and darling. They would also tuck so nicely into Easter baskets. I found the pattern online but the original creator has since made her blog private. It’s a great simple shape, and one you could easily sketch out. The Dark Chocolate Bunny is about 10″ high and the White Chocolate Bunny is 8″. I also have a tan “milk chocolate” 8″ that I’m going to package as a trio for the Tuesday night auction. It’s a pretty easy $10-20 for the program.

My second project has me totally giddy! Felt Rabbit Treat Bags. The original idea and pattern came from MerMag and are adorable! They aren’t hard to make, but the embellishing takes a bit of time. The bag portion is about 4.5″ square with an opening (~1.5″) between the ears for small candies like Kisses or small chocolate eggs. They hold a surprising amount of treats! Such a cute addition to an Easter basket!! And I love that they are totally reusable for the next year, and the next.
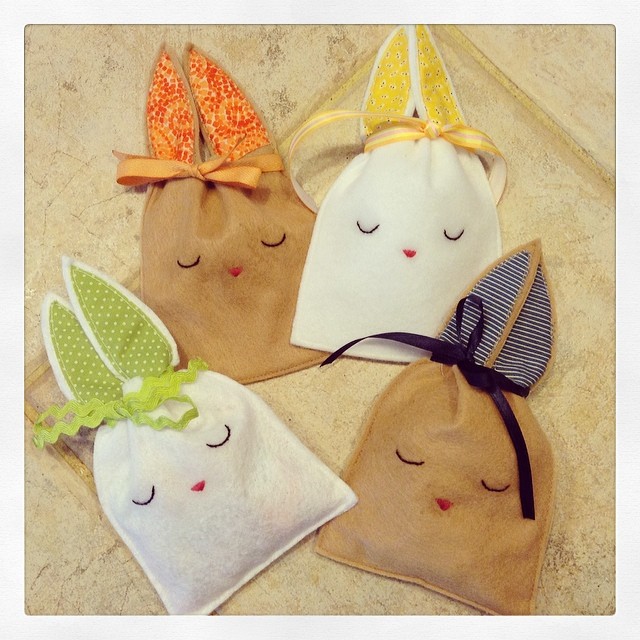
Saturday, I had a small stack of bags I’d made with me and was stitching faces on others, at the kids chess tournament. A friend purchased 3 from me right there. Score $20 for the orchestra. Then Sunday at the auction they didn’t sell at all – A total packaging fail. I had them stacked up in a large clear bag (exactly like the chocolate bunnies above – which did sell) – super cute, honest! – but I don’t think anyone could tell what they were. Ugh … lesson learned. I get it, people want to touch them… I picked them up, made a donation to the program and promptly put a call out on Facebook offering to make bags for friends with 100% of the proceeds going to the orchestra programs. Bam, overnight I’ve sold an additional 11 bunny bags. Good thing I just started a new audio book and have lots of felt!
Hello, Mr. Postman!
The last couple of weeks have been busy for the shop. I’ve made lots of trips to the post office with bundles that look a lot like these.


Monster Safari
An awesome treasury of EtsyKids items curated by cuddlebugkids, ‘Monster Safari.’ Love these bright citrus colors!


Blue and Gold
Tuesday night was the Webelos’ Blue and Gold Banquet. This years theme –> Happy Birthday! So fitting as the Blue and Gold Banquet celebrates the birthday of the Cub Scouting program. Our Pack always has a dessert contest associated with our Blue and Gold Banquet. This year The Webelos wanted to make a multiple layered cone shaped birthday party hat cake. Yep … he wanted to pull that cake off on a school night. Ahhh, No. We brainstormed our options and he decided that cupcakes might be the better way to go. We thought about using sugar cones dipped in royal icing for hats, but then we found these sweet little paper party hats made out of cupcake liners. Perfection!

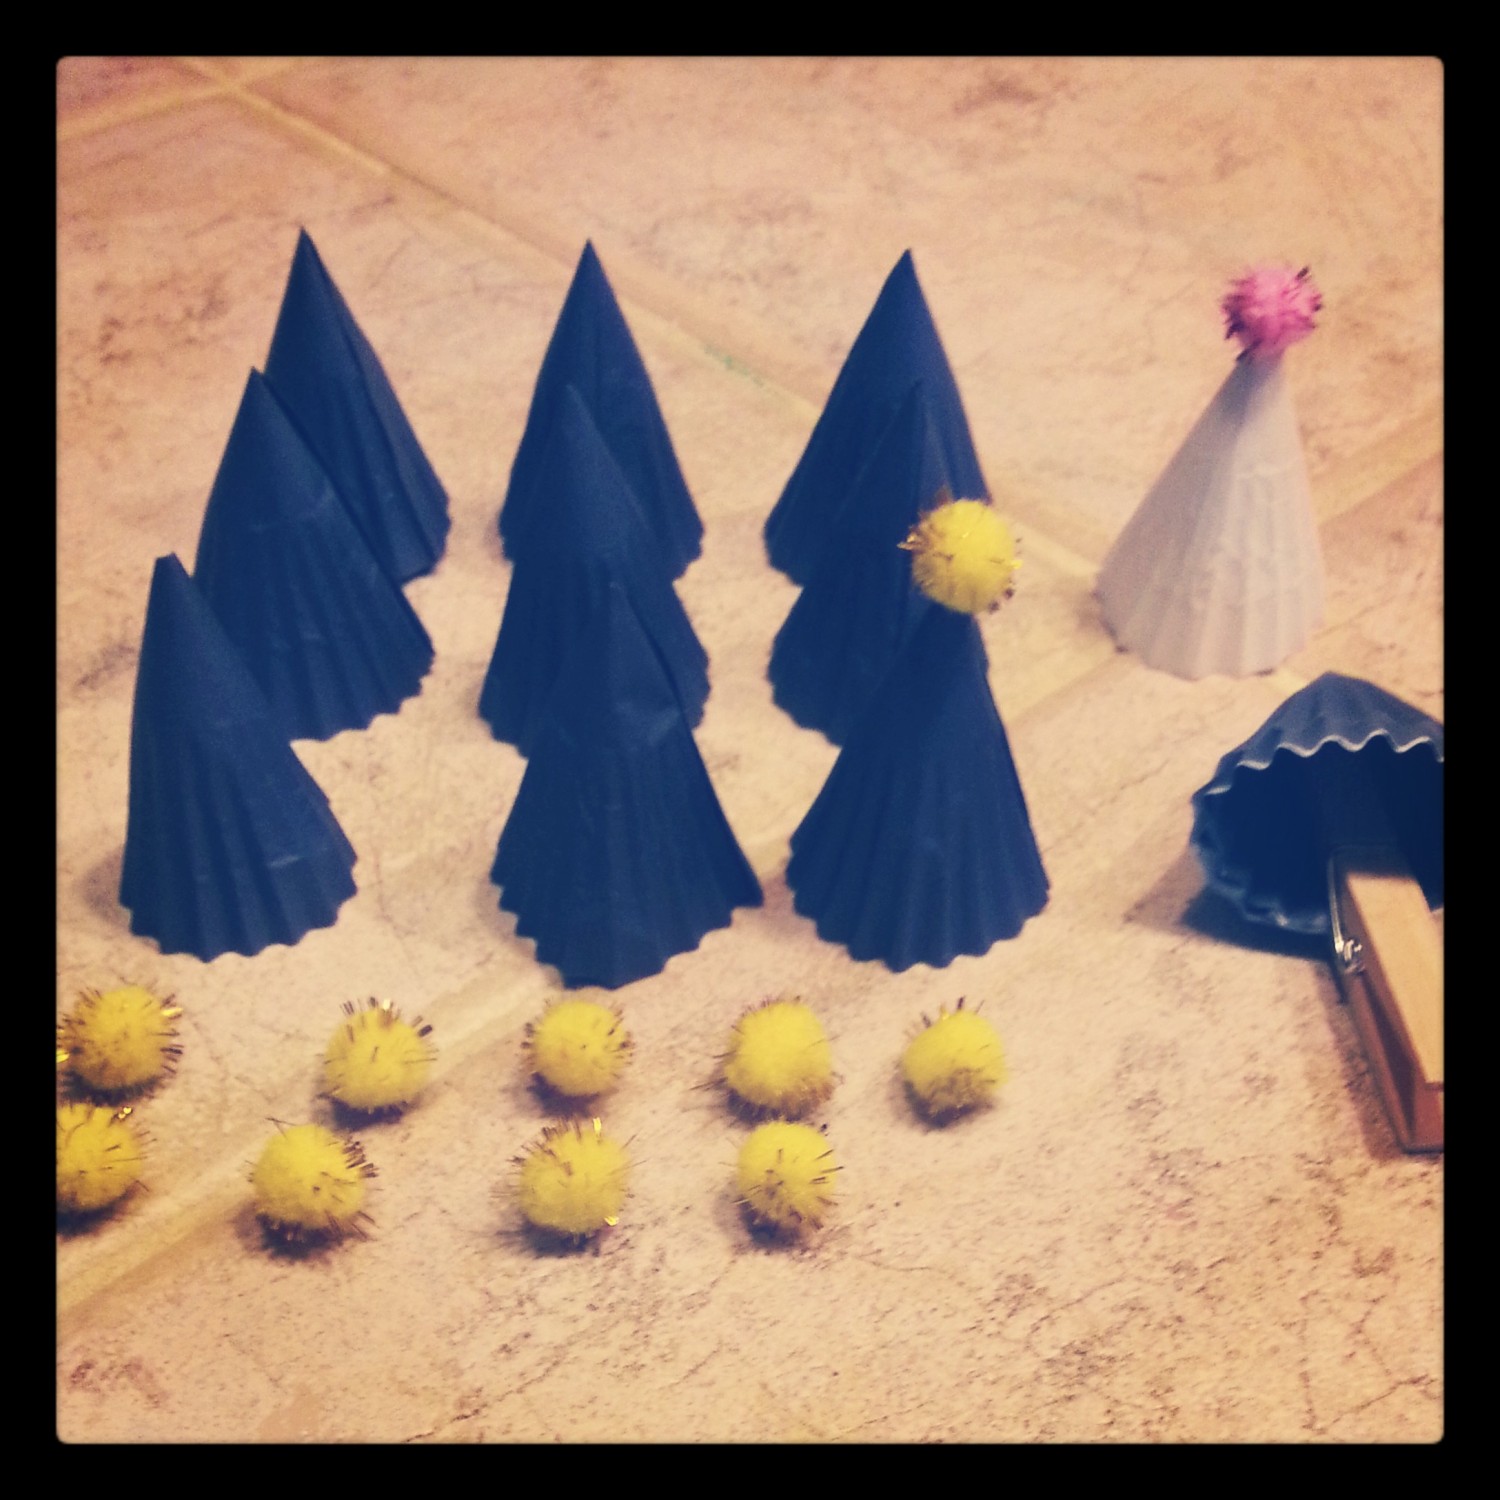
The Webelos helped me make the hats. A regular cup cake liner, folded in half and then rolled into a cone. Once you fold it in half, if you begin to fold it a second time to divide the circle into quarters, lining up the flat folded edge, make a very small crease at the center of the liner, this will help you shape the cone. As you shape the cone, overlap the wavey edge of the paper about 1-1/4″ and secure with a thin line of craft or school glue. I love to use clothes pins when waiting for glue to dry so I can move on to the next item I’m making. They work really, really well. Allow the glue to dry completely before adding the pom poms. The pom poms are glued on with a small dab of hot glue.
I realized Tuesday night that he’s placed each year … as a Wolf, we made Ewok Cupcakes to go with a Star Wars theme. As a Bear, he entered cups of “Black Plaque” (traditionally known as Death by Chocolate) for the medieval theme. And this year as a Webelos he took 3rd place with these cupcakes.
Moist Chocolate Cupcakes (recipe from the Cake Mix Doctor)
1 box* (18.25oz) devil’s food cake mix w/ pudding
1 cup sour cream
3/4 cup water
1/2 cup vegetable oil
3 large eggs
1 teaspoon vanilla
Preheat oven to 350°F. Prepare cupcake pan with liners (recipe will make ~24 cupcakes). Dump everything into a large mixing bowl. *If your cake mix weighs less than 18.25 oz – and most of them do – just add 6T of flour to the ingredients. Works perfectly!
Blend well with an electric mixer for 3 minutes – stop part way through to scrape down the sides and make sure everything on the bottom of the bowl is getting mixed in.
Fill prepared cupcake liners with batter about 3/4 full. Bake for 16-18 minutes depending on your oven. Cool on a wire rack and frost when completely cooled.
Simple Fluffy Vanilla Frosting
1 small box vanilla pudding
1 cup milk
1 small tub of whipped topping, thawed
Blend vanilla pudding and milk until well incorporated. Fold in whipped topping. Pipe onto cupcakes using a large round tip.
This is a really yummy frosting and easy for a kid to make! It is pale pale yellow in color and isn’t heavy so you can pile it on without it overpowering the cupcake. I will warn you that this is a soft frosting that won’t hold the shape of a star tip or similar tip, so keep that in mind when you go to frost your cupcakes. You can make it a bit stiffer by using less milk, but you’ll still want to use round tips for frosting.
Bright Red Firetrucks
Love this treasury, wittily named ‘Weee Oooo Weee Oooo Weee Oooo’ from BluewaterRoadKids. My Red Firetruck pillowcase is featured near the bottom.


Happy Valentine’s Day
Remember the beautiful, lovely hot pink felt acorns from the treasury earlier this month? I bought some, and I love them! I ended up purchasing the acorns from, MagpieJane based out of Texas, because she also had these gorgeous cast blackened beeswax heart ornaments that I had to have.

My tiny red and white quilt
Ages ago I purchased (4) 20″ pillow forms. I’m pretty sure it was THREE houses ago and I can’t rightly remember exactly what the plan was. Oh my, my ability to hold on to things is a blessing and a curse.
Monday I got a bee in my bonnet to make a throw pillow. Something that would be a nod to Valentine’s day but would also work during other seasons. I have always loved red and white quilts. It is a classic quilting color combination that never goes out of fashion and works beautifully with the traditional quilt square, bears paw.

I chose 9 different red fabrics from my stash. They each had a small white print on them and were roughly the same hue of red. Using this mini quilt as my inspiration and this measurement sheet, I made 9, 6″ mini bear paw blocks. To get my quilt top to the needed 20″ I framed the nine blocks with 1 3/4″ strips of the same white Kona cotton I used in the blocks and set red squares in each corner.

Before quilting, I layered my little top with a 21″ square of white cotton fabric, 21″ square of white cotton batting, and another 21″ square of white cotton. I opted to quilt it in a simple diagonal pattern, following the lines of the blocks.

I used the envelope pillow backing method with a sweet little Mary Engelbreit red and white modern toile print I’ve hung on to for ages and ages. It’s perfect for this pillow, absolutely perfect and makes me grin from ear to ear knowing it’s there. Even better that I had just the right amount with only a few inches to spare. I am so pleased with the result!

I used the quilt binding method of finishing off the edges. I hadn’t realized until I was hand sewing the binding down, that I can now use this as a small table top quilt or wall hanging or for it’s intended purpose, a pillow cover.

I love the pop of red with the yellow and green. Ahh, I’m already planning the next one I want to make – there are three more forms to cover. And did I mention this entire project came 100% from my stash! Hoping I can keep that streak going.
Roasted Chicken and Vegetables
I made one of the families favorite winter dinners tonight. Hearty, simple and oh so delicious!

Roasted Chicken and Vegetables
4 breasts of chicken
1 envelope onion soup mix
1/4 cup olive oil
1 teaspoon garlic powder
1 teaspoon pepper
1 pound red/new potatoes
1 pound baby carrots, or regular carrots
Mix soup mix, olive oil, garlic and pepper in large mixing bowl. Preheat oven to 400°F. Quarter potatoes. If using regular carrots, peel cut into sticks about 2″ long. Add potatoes and carrots, toss to coat with oil and seasonings. Cut breasts into 2-3 equal sized pieces. Add to bowl and mix until chicken is coated with oil and seasonings. If you have time allow the mixture to sit for a bit. You can even throw it together just before leaving to get kids from school, and let it sit covered in the fridge until you’re ready to throw it in the oven.
Spread chicken and vegetables evenly on rimmed baking sheet and bake uncovered for 25-30 minutes or until chicken is cooked through and the vegetables are soft.

Why be Normal, Be Fabulous!


Featuring my Raspberry Burp Cloth Bundle. I’m totally loving the Fuchsia Felt Acorns. Wouldn’t they make an fun and unexpected Valentine decor accent?
Snicker Valentine’s, to make you giggle
The 7th grader is in Student Council and announced Sunday that she needed 24 Valentine’s this morning for a StuCo, teacher Valentine project. And apparently, candy is appreciated. I heard ya! I learned that lesson when I sent candyless Valentines with the oldest to Preschool. When she came home and went through her Valentines, I saw just how much attention got paid to candyless Valentines. Wow. Lesson learned, message received, mistake not repeated.
Have I mentioned my aversion to todays store bought Valentines? I’m beginning to realize it’s right up there with my aversion to store bought Halloween Costumes… back to Valentine’s Day.
Here’s what we made …

Those are 4″ cardstock squares folded into 2″ x 4″ business card envelopes that hold a Valentine joke inside. I printed “Get ready to” on the front side of the envelope and “Happy Valentine’s Day” on the back. Folded them in half, and sewed the sides together – you could totally tape the sides closed and washi tape would be super cute! Then, so you could see that something was inside, I punched half a circle out of the top so the joke card peeks through. The candy bars are hot glued on … just so you know, Elmers was a total failure.

Fun right?
I got the jokes are from Kristen Duke Photography’s blog. They are intended as Lunch Box jokes, but they really are perfect for this project. Kristen’s only has 10 jokes and if you’d rather not have repeats in the classroom, I found these this afternoon on All for the Boys. They don’t look to be the same size, so you’ll want to make either an adjustment to the joke card, or your envelope. If you find other good business type size jokes will you post a link?

Apparently they were a hit with the StuCo advisor. <phew!> Not sure yet if these will meet the approval of the 5th grader, but I think the 2nd grader is interested. Sadly these wouldn’t be much fun for the Kindergartner, so we’re still searching for the perfect Valentine for her to give out. She may make each of her classmates a Rainbow Loom bracelet… are those still all the rage? Seemed like they were a very short lived fad here.
SNICKER VALENTINE directions: Here’s the file I used to make the 2″x4″ envelopes {SNICKERValentine_Envelopes}. Print on 8.5″x11″ cardstock, cut apart making the envelopes 4″ squares, fold in half and secure the sides with washi tape or sew them together. Mark the middle of your envelope opening with a small pencil mark. Using a 3/4 circle punch, punch a half circle centered on your pencil marking, making sure not to cut into the words. Insert a business size joke card (2″ x 3.5″), sign the back and hot glue the snicker bar to the front.


